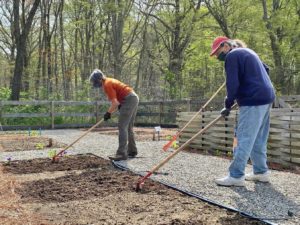
When it comes to gardening, you have black gold right at your fingertips and may not even realize it. What I mean by that is that your yard waste and food scraps can be turned into compost and then used in your vegetable garden to increase yield.
Why compost? Maybe these reasons will inspire you to start your own compost “pile”:
- Composting reduces household waste by up to 30%. Keeping food scraps out of the incinerator reduces greenhouse gases, decreasing pollution and the emission of carbon dioxide (CO2) and nitrous oxide (N2O). Nitrous oxide is 310 times more powerful in atmospheric warming than carbon dioxide.
- Composting reduces energy consumption. The process of composting requires fewer work hours than incineration and no fuel deliveries, further lowering greenhouse gases.
- Composting food and yard waste will create nutrient-rich fertilizer for the soil in our gardens, where it can support the growth of fresh new food for our tables. Compost contains three primary nutrients needed by garden crops: nitrogen, phosphorus and potassium. It also includes traces of other essential elements like calcium, magnesium, iron and zinc.
- Composting eliminates our need to rely on synthetic fertilizers that can contain harmful chemicals.
- Composting increases the soil’s water-retaining capacity and thus decreases water usage up to 20,000 gallons per acre.
Composting can be as simple or as complicated as you would like.
Hot composting is a process you will need to manage:
- It will require attention to keep carbon and nitrogen in the optimum ratio to decomposed organic waste (food and yard waste). The ratio is two parts to four parts carbon (“browns” dead leaves, wood ash, eggshells, sawdust, wood chips and straw) to every one-part nitrogen (“greens” such as fresh grass clippings, fruit and vegetable peels, coffee grounds and tea bags). The wrong proportion will leave you with either a dry or slimy compost pile. Do not put the following items in your compost pile: meat, bones, cheese, salad dressings, oils and other fats, and pet waste).
- Your compost pile will also require the right balance of air and water to attract the organisms that thrive in an oxygen-rich environment. Optimal airflow can be achieved by layering materials, making sure your material is in small pieces (ideally no thicker than a finger) and turning your pile regularly will provide needed aeration. It is recommended that you turn your pile (or rotate your tumbler) around once a week during the summer, and at a minimum once every three to four weeks during the winter.
- As for water, the ideally moist household compost pile will be about as wet as a wrung-out sponge. If you are including food waste in your pile, it may be wet enough — if not, just add water.
The optimum temperature for hot composting is 140-160 degrees Fahrenheit. This high temperature kills any lingering bacteria or weed seeds.
Now, where to locate your compost pile. Make sure it is accessible from all sides, so it will be easy to water and aerate (turn). Position the pile close to compost materials and water. Protect it from the wind so it won’t dry out. Place it out of direct view from the road and neighbor’s homes.
A three-foot cube is an ideal size for a compost bin or pile. Larger than five feet does not allow the temperature in the middle of the pile to get to what is needed for ideal decomposition.
To start your pile, layer six inches of brown material, then a two-inch layer of green material, and then a two-inch layer of soil (which contains decomposers and helps prevent odors from developing). Wet the compost pile, if needed, as you layer. Leave the pile alone for four days to allow initial decomposition to begin, after which you can regularly aerate your pile or bin by turning with a pitchfork, and monitor the moisture level. A typical compost pile will take three to four months for material to decompose. You will know when your compost is ready to put in the garden when it is no longer hot in the center and looks dark brown, crumbles when squeezed, and smells like fresh dirt.
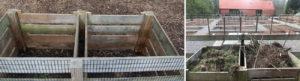
A closed compost bin allows for the retaining of heat and moisture and lessens the chance of animals entering your pile. Closed bins typically have an open bottom which will be placed directly on the soil. If you choose to have an open bin, you may have to deal with animals.
Compost bins can either be bought or you may choose to build your own. If you build your own, you may need to drill holes in the sides to allow for airflow. Be careful not to have your holes so large that rodents can enter your compost pile. Materials that can be used in building your compost bin are wine crates, plastic storage bins, old wooden dresser drawers, garbage cans, wire mesh with metal or wooden stakes, and wood pallets. Purchased tumbler bins come with a handle that allows for turning your bin for aeration.
If you’d like to get started composting but feel overwhelmed at the thought of having your own compost bin and pile, it’s worth checking with your local township to see if they already have a program in place! Media borough has a composting program that allows you to collect food scraps that will be picked up and added to the town’s compost pile. Check out their Environmental Advisory Council’s website for more information.
Before adding compost to garden soil, have your soil’s pH, nutrient balance and organic matter content analyzed before adding fertilizer or amendments.
When adding compost to garden soil, mix one to two inches of compost into the top 6/8 inches of topsoil. Some suggest compost can also be used as a mulch and applied at a thickness of one to two inches. This should help suppress weeds and help conserve water.